It’s electric! (and kinda expensive)

As the proud new renter of an apartment, I was crazy shocked when my first electric bill showed up. It was $89.50! And I’d only been living in my apartment for 3 weeks! Granted, $24 of that was the connection fee which is a one time payment and another $10 of that was a surge protection plan I had accidentally been charged for. But still, the electricity portion of the bill was just under $50.

I like to think I’m a pretty energy-conscious person. I was raised to turn off the lights when I left a room and taught to keep the thermostat cooler in the winter and warmer in the summer to avoid temperature fluctuations and keep your AC from working so hard. So that’s why I was a little surprised when I received that bill. What had I done wrong? Used my ancient dryer too much?

IMG_20190306_162913
The 1970s called. They want their dryer back.

As a person who works from home, I’m probably using more electricity than most of my neighbors who go into the office, but I try to use only the lights I need. You know, like a sensible person. My apartment has AWESOME windows. They’re huge and let in a ton of natural light. My desk is set up right by the patio window so I can get the benefit of that sunlight — when it’s not raining constantly, that is.

IMG_20190306_164511
A rare sunny day! It rained almost every day in February.

My little desk lamp (an awesome IKEA find) provides plenty of task lighting when it’s gray outside.

When I moved in, I quickly switched out the bulb in one pendant fixture for a Philips Hue bulb, which I can turn on and off with my phone or Google Home. I like that I can dim it at night when I’m watching a movie and I also like that it’s an LED with a long lifespan. But the other light bulbs that came with my apartment were incandescent or compact fluorescent (which contain mercury…yikes). So, as I begrudgingly went online to pay my power bill, I was excited to see an ad on the Duke Energy site for their free LED program, offering 15 LED light bulbs at the low, low price of free (hot tip: see if your energy company has this and if you’re a Duke Energy customer, click the link and see if you’re eligible).

IMG_20190306_162836

Well, today they arrived! So I spent about 45 minutes climbing on furniture and counter tops screwing them all in. Let me tell you, the difference is noticeable. After finishing the 5 lights over my bathroom sink, I switched them on and then promptly felt the need to put on shades. After making sure the bulbs were rated for fully enclosed fixtures, (don’t skip this step — it’s important) I installed one in the fixture above my shower and was really pleased with the difference in brightness. Before, my shower was kind of dim and it took a while for the previously installed CFL to brighten up. Not anymore!

LED bulbs can save up to $150 over the life of the bulb (usually ~20 years!). Since these bulbs were free and will help me save some energy cost, I’m hoping that my next power bill will be a bit lower. Maybe I can convince my landlord to upgrade my washer from 1975…

IMG_20190306_163557~2

Oh, you thought I was joking about the sunglasses, huh?

A New Take on Standards (and why you should be writing them down)

Architecture meeting

We are all still learning. Every day there is something new you can learn whether it’s big or small. Sometimes, the seemingly small details are really the most important. The little things fit together to form bigger pieces of the puzzle. Once all the pieces come together, you have a beautiful image.

Your office standards are that image, the image of a company that’s efficient and detail oriented. Each detail from the colors and size of your logo to the way you name and organize files adds up to create that picture. But sometimes employees might not know about all these details. There are lots of them and it can be hard to keep them straight. Employees both new and old might find themselves struggling to remember how things are done in the office. That’s why it’s critical that they be written down and made available in some way. This can be a document on a shared server, a file saved on everyone’s computer, or even a printed copy each employee can have at their desk for reference.

Because many people might be touching a file and passing it off to someone else, it’s a good idea to set up standards for how a file is organized or created. There are several ways to set up a Revit file, for instance. Someone who’s new to the company might not yet know how the file is set up at Raddest Baddest Designs (a totally perfect name for a firm, right?!) because it was done differently at Insanely Cool Architects, PLLC (I’m super good at naming companies) where they used to work. Even though the differences might be small, they can completely change the way the file behaves (trust me, accidentally setting up your project in the wrong template can make all sorts of things go haywire.)

As technology changes or your office culture shifts, you might decide to revisit sections of your standards and change them accordingly. This is good! Your standards are like the Constitution; it can and should be amended. Things won’t always be the same as they were when you started and as things become more efficient, your standards should be updated to reflect that. Just remember that everyone needs them now and then, some people more than other. One thing is for sure: they need to be written down. And passed around. And read. Everyone can share in the joy of an efficient and capable office environment just by being on the same page.

Ready Layer 1 – some thoughts on Photoshop rendering

Using Photoshop for renderings can add a lot of life and personality that you might not get from using BIM renderings alone. It’s the little details that really make a rendering pop but when you’re still in the schematic phase, renderings can help you show various material or signage options to your client. The layers can be easily turned on or off depending on what you want to show.

The trouble starts when you don’t name your layers. Each new element should be placed on its own layer and named with a description detailed enough that you and your teammates know exactly what it’s referring to. For example, if you wanted to add a maple wood grain to several surfaces, you might label them something like “Maple Wood Grain – Table Tops” and “Maple Wood Grain – Chairs.” This way, everyone can tell what that layer is for. If you wanted to change something on that layer, it would be easy enough to do so.

When you hand your file over to someone to allow them to make edits and it’s returned to you with a mess of unnamed layers, layers that have been flattened together and are difficult to edit, and tons of “____ copy” layers, it can be difficult to make any required changes easily and efficiently. This is why communication with the whole team is important. Establishing guidelines for layer management is crucial to the efficiency of the person doing the rendering. Naming convention should be clear and layers should contain individual items so that they can be moved around to achieve the desired effect.

Lookin’ For a Breath of Life

20170717_141739

Succulents are quite possibly my favorite plants, not just because they’re super cute, but because they also are extremely easy to care for and grow. The leaves above were taken from one plant that I propagated the first week of June. I plucked the leaves off carefully and let them dry. It’s important not to water them until you notice roots or plants sprouting from the mother leaf or they will begin to rot. From the once large plant, I created several babies. Almost every leaf I pulled off has sprouted a new plant.

20170717_141746The sprouts took a few weeks to appear, but now that they’ve started to grow, there’s no slowing them down! I’ve started planting them in tea cups as cute gifts for friends. They also make perfect decorations for window sills and shelves that need a little life.

Succulents are very low maintenance and easy to care for. All you have to do is mist them about once a week or whenever you notice the soil is very dry. If they get too big for their container, you can propagate them like I’ve done here.

I’m still waiting for the mother leaves to wither and detach from the new plants. When that happens, the new plant will be able to sustain itself with it’s own roots. Some of them are already starting to grow thin little roots and those are the ones I’ve placed in soil. They’ll begin to grow quickly.

You’re probably thinking: “Hailey, what does this have to do with design?” As I learned while researching for my Hotel 92 project, quite a bit, actually. Houseplants in general have many benefits, but succulents are different. Most plants photosynthesize during the day and take in carbon dioxide while outputting oxygen. But at night, they breathe just like humans meaning they suck up oxygen and put out carbon dioxide. Succulents, however, only release oxygen. This makes them great for keeping around the house, especially in your bedroom or even on your desk at work.

20170717_141758

Another reason succulents have so much appeal is because they are a great example of fractal patterns found in nature. These patterns can make you want to connect with your environment and can lower stress. Even just looking at natural elements can cause your heart rate and blood pressure to drop, relaxing you and making you more focused. So of course designers are going to look at the benefits of succulents! Our goal, as designers, is to make people feel comfortable in their environment and succulents reduce stress, clean the air, boost productivity, and help you breathe a little easier, all of which make you feel better in your space. As a bonus, they’re also very stylish, come in a multitude of colors and shapes to fit with any look, and they can be planted in a wide variety of ways, from tea cups to living walls. Add a little breath of life to your space; get a succulent!

I Wrestle a Mid-Century Cabinet (Part 1)

Church yard sales are good for many things. For example, you might find a nice hand mixer for $5 or a crock pot which has likely cooked for many potluck dinners for $10. You might walk around and see an old record player that could be pretty cool if you had any idea how to fix an old record player. You might see 5 or 6 enormous tube televisions which weigh 200 pounds each and which no one is interested in because, come on, it’s 2017.

And then you might come back later in the day, just before closing, to see what’s left. And when you do, you might stumble upon a China cabinet which is just the right size and has those lovely tapered spindle legs which you love so much. And it’s practically perfect. So you ask how much and you walk away with a $10 vintage treasure.

20170522_142946

And it needs a little work. Someone clearly had it near a window, it’s all faded in places. It probably had a house plant sitting on top that someone drowned. You can tell because of the rings of water damage. But, you say to yourself, it was only $10 and I’m going to fix it. And when you open it, it’s full of spiders. So you recoil and decide that it’s really gross how many spiders are living in this thing. Ugh!!! Is that an egg sack?!? It is.

You aren’t even quite sure what color the wood is supposed to be because it’s so faded, but it needs to be stained anyway. So you settle on a nice dark brown to compliment some of your other furniture. Yeah, that sounds nice. Lucky for you they sell Polyshades that can be applied over previously finished surfaces with only a little sanding. Because sanding sucks and you don’t want to do more than you have to.

Before you can do all of that though, you take the doors off. And because you are very unlucky, the screws are stripped. And one of the hinges is super bent which makes it basically impossible to get off. So you call in your reinforcements (your dad) and he helps you get it off. You also take off those rad brass drawer pulls. And you also take out the creepy green felt drawer liner because it’s covered in guess what? More spiders.

You decide, then, that it is time to go to the hardware store to get some of the previously mentioned Polyshades as well as some brushes and new hinges for the doors because the super bent hinge is not great. But because you are unlucky, and because it is 2017, they don’t make the weird hinges that you need. They are a strange size. They have a strange number of holes. They are probably from 1955 and therefore aren’t produced anymore. You get frustrated and purchase the rest of your materials and then go to another hardware store down the road. And another. And you’re pretty much over this. Face it, they don’t make these anymore. So your reinforcements (your dad) come to your rescue and hammer it until it’s flat again. See? Good as new.

20170630_132054

Now you can begin the sanding. And maybe since you hate it so much (it gets in your contact lenses!), your mom helps you. And you sit on the floor with the doors and sand them by hand with a 60 grit block. The weird faded stain dust gets all over your legs. And your hands. And your t-shirt. Once you use a tack cloth to wipe away all the dust that has now gotten all over your life, it’s time to stain.

You use a natural bristle brush like the can says. You apply a thin layer like the can says. You wait 6 hours for the first coat to dry like the can says. You come back and poke a little section afterwards to see if it’s ready. It feels sticky and gross. It leaves fingerprints behind. It’s just humid you tell yourself. It’s always humid. It’s the South in the summertime. So you think maybe it needs a little extra time like the can says. You check on it later. It’s still tacky. You check multiple times each day. You set up a box fan which blows on it for 12 hours a day. Five days later, it is finally dry. It is time to use the steel wool like the can says. You don’t use 000 grade steel wool like the can says. You don’t have any so you settle for 00 instead. It works fine anyway. After you put 2 more coats on (which dry in the appropriate amount of time) you notice that the doors have little bits of debris that have dried into the stain. Well, crap you think to yourself. They look really bad. Because you’re unlucky and that’s how these things go. Is that cat hair? It is. The friendly neighborhood cat has been hanging around while you paint. It’s a wonder he didn’t get wet polyurethane on his fur.

Your mom sands again because you hate sanding. While she does, you scrape excess stain off the sides where it dripped. You also clean off the mysterious sticky goo that has accumulated on the side of your precious cabinet. You go to check up on the doors and then you see that the stain, which wasn’t going on super evenly to begin with, has not come off evenly either. It would be very hard to redo because it would still be uneven and gross. You despair.20170709_151507

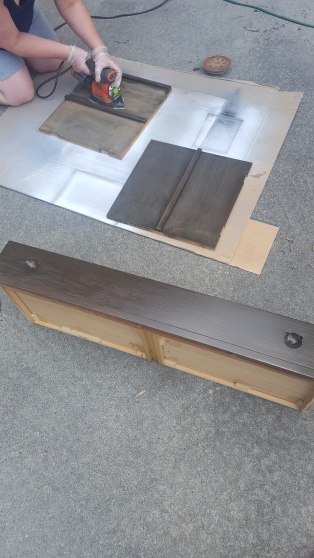
Once your despair passes, you turn to your most trusted ally (Pinterest).You look for some ways to fix the mess you’ve created and you find some pictures of a TV console that has a wood exterior and white doors and drawers. Ah, yes! you think. A solution! You have a can of white furniture paint from when you made your kitchen table and it will cover the splotchy patches on the doors. And you will have to paint the drawer too to be consistent. You will have to sand it. Actually, your mom will have to sand it because you hate sanding. Once it’s sanded though, you decide you can fix it.

But there is a dilemma. Because you are unlucky. And that dilemma is: should you stain the raised details on the doors to keep the outline aesthetic you’re going for or should you paint it white like the rest of the door (which would be a lot easier)? You ask yourself Am I willing to suffer for the Aesthetic? And the answer is probably yes. But you are unlucky, so we’ll see how it goes.

If this story sounds familiar, then you are probably me, trying to wrestle a mid-century cabinet. And if you aren’t me, then we are joined in suffering as we try to wrestle our furniture into something a little more stylish and a little less sun bleached.

Stay tuned for Part 2 where we find out what happened with the paint job!
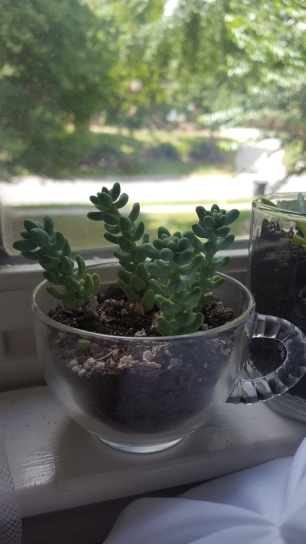
Too Cool For School (Part 2)

After soooo many coats of polyurethane, the tops of the desks were ready to be attached to the bases. The original desk tops were a bit thicker than the birch wood I used for the new tops. I figured since the thickness wasn’t too different, we could use the same length of screw (1/2″). After double checking, it seemed like the half inch screw might pop right through the top and ruin the whole thing. So off to Lowe’s we went.

Since the holes in the desk base were kind of big, we thought we would need a #8 3/8″ screw. It turns out this is really difficult to find because whoever is making the screws decided that if you want the #8 thickness, you probably want a long screw right? No, screw company, I have needs and they are tiny thick screws for desk renovation projects! Finally, hidden behind some stuff in the wrong place, we found them.

After flipping the desk upside down and tracing the holes onto the wood and then measuring obsessively until it was even, they were ready for assembly. We started by making a little indention for the screw to sit in. On a couple of them we drilled small pilot holes, but this wasn’t necessary for all of them. Then we screwed everything in by hand.

Once everything was attached, we had to adjust the leg height. My futon has a seat height of 15 5/8″ which is a little low, so we dropped the legs on the desks as low as they would go. After busting out the level and making sure each leg was the proper length, these end tables are ready for action!

20170604_202357

Perfect for storing my growing collection of coloring books and pencils!

20170604_202431

Don’t be afraid to get wood with knots! It adds depth and character and looks great after layering on the polyurethane.

20170604_202447

Too Cool For School (Part 1)

As I finish up my last semester of college and prepare to graduate, I’m starting to think about moving out and having my own apartment. Honestly, it’s a little stressful. I want to move to New York City and, ideally, I want to have an apartment that looks like…well, like a designer lives there.

So I’ve been scouring LetGo and VarageSale and Craigslist for gently used furniture pieces that I can fix up and use. It’s way cheaper than buying all new since I’m on a budget and some of the things I’ve found have been really good quality at a price I (almost) felt I should be paying more for. And I’ll be able to point to stuff and say “look, I made that!” which is pretty cool.

When we found these old school desks (like the kind I remember from elementary school), I had to get them. Not only are they sturdy and metal (they’ve got to hold up to years of rowdy kids) but they have storage space and, with a little fixing, they’ll make great end tables.

20170415_184010

Since they have been used and they were kind of old, they did need to be hosed down and cleaned up. The tops were removed and spots on the inside had to be scrubbed down with steel wool to remove rust then sprayed with some clear coat to prevent further rusting. Then it was time to tape off the legs and start painting!

20170416_111028

So far, so good! I chose a lighter blue spray paint to give these a fresh look.

20170416_111025

Ah, yes. Much better. Now for the tops. The ones they came with are obviously durable, but they’re not the most aesthetically pleasing. I would need epoxy paint in order to get a strong finish, so instead I went with maple plywood, sanded down smooth and sealed with polyurethane to keep it looking nice and to bring out the colors of the wood.

20170417_132215  20170417_141200

Before and after: it definitely enhances the wood grain and gives it a nice shine.

Now all I’ve got to do is polish the legs up and screw the new tops on and these tables will be ready to go! Stay tuned for part 2 where I’ll show the finished project!

The Odyssey Lives On!

Betty comes to the review

Over the summer, I worked for Panolam Surface Systems and traveled the country updating sample libraries in hundreds of firms. During the first week of work, I was in Charlotte working with the local spec reps there. And now I’m working with them again!

For my senior project, I am designing a boutique hotel in Brooklyn’s DUMBO neighborhood which boasts a thriving art and theater scene as well as famous bakeries and trendy shops. The hotel, which features a strong emphasis on biophilia, will incorporate plants, water features, lots of natural light, and fractal patterns which mimic nature. It will follow Well standards to make guests feel healthy and relaxed.

In order to study hotels and get some fresh perspective from people who stay in hotels all the time, I am working with Betty to design my building. We have visited the Marriott prototype hotel in Charlotte, NC and will be visiting an Extended Stay prototype later this week. She has come to Boone just to help me with the project and together we have come up with some new space planning ideas and ways to make the hotel even more comfortable for guests!

I am excited to unveil the final presentation on May 6th at Senior Portfolio Review. This wouldn’t be possible without the support from my connections at Panolam. So thanks, IIDA. Because of you the Modern Odyssey lives on!

Cincinnati’s Art Deco

If you’re like me, you’re obsessing over the architecture wherever you go. In Cincinnati, there’s a lot of old buildings with tons of character, new buildings with sleek lines, and AMAZING examples of Art Deco style. I remember going to Union Terminal as a kid, but I didn’t have the appreciation for design that I have now. Getting to go back there was great.

20160715_113206

Unfortunately there was a lot of renovation work being done both inside and outside, so we didn’t get to go past the ticket counter.

20160715_113559

I absolutely LOVE the windows on the front of the building.

20160715_113541

The ceiling is so colorful and fun. We didn’t get to do it this  time, but if you and a friend stand on opposite sides of the arch and whisper into the corner, you can hear each other even when there’s a crowd.

20160715_113746

There are also amazing murals depicting Cincinnati’s industrial history and accomplishments.

20160715_113702

It’s clearly being worked on, but it was so pretty.


Next we went downtown to Carew Tower which just…

20160715_122219


Right away there was this historic mail chute with AMAZING engravings. Art Deco is probably one of my favorite styles because the details extend to every single feature, from the door handles to the flooring to the moldings and trim around walls and columns. This mail chute was no exception.

20160715_122250

And then, like 3 feet away, there were the elevators. I just obsessively photographed them while we waited for them to take us up. The pattern was beautiful.

20160715_123015

The restaurant upstairs is stunning. Every single surface bares the same level of detail, even if it’s not visible from below. It’s all there. The fountain and baby grand piano at the far end made a really nice focal point from the balcony above.

20160715_123554

The Hall of Mirrors was equally beautiful but in a very different way. The golden mirrors along the walls make it feel so warm. The ceiling and the railings all have impressive amounts of detail. The light fixtures are my favorite thing though.


I am so glad we got to visit these two beautiful buildings and I am VERY thankful to the Carew Tower employees who were totally OK with us wandering around and taking pictures of everything.